Search

Sunday, January 29, 2012

Oatmeal Chocolate Chip Cookies


Mommy decided to have a total baking fest today and send some yummies to our cousins and aunt and uncle back in Boston. I felt I should chime in and help her because that meant that I also got to taste everything. We had already done chocolate peanut butter cookies and chocolate fudge brownies so I was told not to make anything else with chocolate. But let's be honest, who DOESN'T love chocolate?! And personally, I love anything crunchy and oatmeal cookies are always oozy on the inside and crunchy on the outside; the perfect combo!!! So I vetoed the no-chocolate rule and baked my little heart out!!!

What you'll need:
3 cups oats (uncooked, obvi!!!)
1 stick softened butter
3/4 cup tightly packed brown sugar
1/2 cup granulated sugar
1 tsp. pure vanilla extract
1 tsp. cinnamon
1 tsp. baking soda
1 tsp. salt
1/4 cup chocolate chips (or more if you'd like!)
2 eggs
1 1/2 cups all purpose unbleached flour

1. Preheat the oven to 350*.
2. Mix together the sugars and the butter in an electric mixing bowl.

3. Add the eggs and vanilla and beat well.

4. In a separate bowl sift together (to get out all of the lumps) the flour, baking soda, cinnamon, and salt then slowly add on LOW to the electric mixing bowl.

5. Add the chocolate chips and the oats at the end.

6. Grease (or line with parchment/wax paper) a cookie sheet and bake for 8-10 minutes.

7. Let cool on a cooling rack and dip into a glass of milk!


enjoy :)

Vegan Spinach Artichoke Dip

With awards show season underway, you all know that we love to make good junk food and watch the shows. They usually involve lots of cheese and meat and that just isn't fair to my dear vegan mommy. A classic appetizer is always a good cheesey dip. Of course we have to try and be healthy, so spinach dip is always a great choice! This vegan spinach artichoke dip (which does NOT taste vegan) is sure to please ANY crowd. If you refuse to make this in the vegan form then you can use regular mayo and cheese to make it carnivore friendly. Serve with crackers and sliced cucumbers.

What you'll need:
1 pack of frozen spinach
1 can artichoke hearts, drained and chopped
1/4 cup vegan parmesan
1/2 cup vegan mayo
1 tbs. dried onions
1 tsp. tabasco
1 tsp. worcestershire
1 oven safe bowl

1. Defrost and drain your spinach.
2. Drain and chop the artichoke hearts and add them to the spinach.

3. To the bowl add the mayo and parmesan and mix well.

4. Finally, add the onions, tabasco and worcestershire.
 

5. Place everything in an oven safe bowl and place under the broiler until the top is oozing and goozing and bubbly.
6. Serve IMMEDIATELY and with crackers and veggies

enjoy :)

Friday, January 20, 2012

Grown Up Grilled Cheese & Tomato Soup

Out of my 4 years in college, I lived in my sorority house for 3 of them. Without fail, we had tomato soup and grilled cheese for lunch EVERY Friday (to help nurse us back from the night before). Really, is there anything that is much more comforting than a greasy grilled cheese and a sweet tomato soup? After a long day of cleaning up after 4 year olds, I wanted a good old fried sandwich and soup to dip it in. But I really don't like the metaly taste in canned soups so of course I had to make my own!!! I was going to make it in my slow cooker and let it slowly go from chunky tomatoes to soupy perfection but, alas, I forgot the basil :( But that's ok, it still turned out GREAT. AND, with NO salt!!!!! :)

What you'll need:
3 lbs. roma tomatoes
1 15 oz. can diced tomatoes (preferably no salt added and organic)
1 cup chopped basil (save some for garnishing, too)
Dash of red pepper flakes
1 medium onion, chopped
6 cloves chopped garlic
Olive oil
Salt & pepper for the tomatoes
4 cups low sodium vegetable broth (preferably organic)


1. Preheat the oven to 400*
2. Cut the tomatoes in half, lengthwise, and season with olive oil, salt, and pepper (Or, if you have time, you can roast them the way I did in a previous post seen here)
3. Season with olive oil, salt, and pepper and roast for 45 minutes.
4. Meanwhile, in a large pot, heat some olive oil and sauté the chopped onions for about 5 minutes.
 

5. Chop the garlic then add them to the onions and red pepper flakes and sauté for just a minute (burnt garlic is ICKY!!!).

6. When the tomatoes are cooked, add them to the pot along with the canned tomatoes, chopped basil, and veggie broth.

7. Let everything cook on medium/low heat for 30 minutes.

8. When the flavors have come together, use a hand blender and mix everything together (it should still have texture!) If you don't have a hand blender, you can use a regular one, but just do it in SMALL BATCHES. It will explode ALL over you!

9. Garnish with some chopped basil and a sprinkle of parmesan!

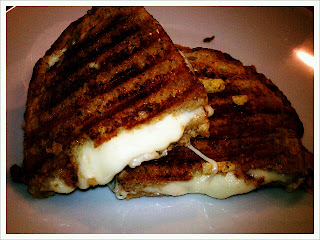
Oh, and don't you dare think that I was going to eat a nasty processed cheese and white bread sandwich. No no no, friends! This is a grown up grilled cheese. What makes it grown up, you ask? Truffle butter :) It's about $10 for a small container, which sure beats $5,000 for full truffles.

1. Simply butter (truffle butter!!!) each side of some GOOD quality bread (I chose sourdough).

2. I used a panini press but you can use a regular pan on medium heat.

3. Once the cheese melts, cut the sammy in half and eat RIGHT AWAY!!!
enjoy :)

Sunday, January 15, 2012

Tuna Tartare


Today is Sunday, which usually means eating comfort food on trays in front of the TV. But, tonight is not just any regular Sunday, it's the Golden Globes!!! Around here, we LOVEEEEE award show season!!! It's like every holiday all mixed into one! Naturally, we needed to serve some delicious hors d'oeuvres to eat as we pretended to be Joan Rivers and the Fashion Police (Jane Fonda= BEST DRESSED!!!). What is better than tuna tartare?! It's refreshing, light, and pretty darn tasty!!! I've never attempted to make anything like this, and I'm just too afraid to make any fish that isn't salmon. But, I went to my dear old Barefoot Contessa and took some pointers (of course, I had to tweak it and make it my own)... then I remembered that in Ratatouille they tell you that "anyone can cook!" So here went nothing! Now, we could have served this with some boring sesame crackers but that is not who we are. We fried up some of our own wonton chips. I think everything is spice (even ketchup) so I was a little scared I was going to burn a hold in my mouth. But the lime juice and zest totally evens out the spiciness... and boy was this delicious!!! Now, it is expensive (please please please use sushi grade sushi for this. Regular ahi just won't do), but if you have a party or a special event, it's the PERFECT dish that WON'T fill you up (too much) before dinner.

What you'll need (this will make a LOT... enough for about 8 people.)
2 lbs. FRESH sushi grade tuna (don't even bother with frozen)

FRESH (Sushi Grade) TUNA. How gorgeous is that color?!

for the tartare:
Zest and juice from 1 lime
1 tbs. wasabi (or more depending on how spicy you like it)
2 avocados
1 tsp. kosher salt
1 tsp. pepper
about 1 tsp. Sriracha sauce (or any hot sauce)
1 tsp. toasted sesame seeds
2 scallions (the whole thing!)

for the fried wontons:
1 package egg roll papers
2 cups peanut oil

1. Cut the tuna and avocados into 1/4 inch pieces and place in a bowl. Set aside.
2. Zest and juice the lime, and slowly whisk in the pepper, salt, hot sauce, and wasabi.
3. Into the bowl with the tuna and avocados, add the chopped scallions (white and green part).
4. Slowly and CAREFULLY add the lime and olive oil mixture to the tuna. Toss gently and cover with plastic wrap and let chill in the refrigerator for at least an hour.

Now for the wontons...
1. Heat your peanut oil in a wok or another pot on high (you'll know it's hot enough to fry in when you stick a wooden spoon in the oil and it bubbles).

2. Cut the wontons in half diagonally, then again to make triangles (IT'S VERY IMPORTANT THAT YOU CUT SLOWLY, AND DO NOT DRAG YOUR KNIFE!!!).
3. Add the slices 2 at a time for LITERALLY 3 SECONDS PER SIDE, then flip!!!!! Any longer, and they'll burn. As they sit on the towel, they'll get darker.
4. Place them on a baking sheet lined with paper towels.
5. Let them cool before you eat them.

Now back to the tuna...
5. After the wontons are ready and the tuna has chilled, place on a platter and serve!

enjoy :)

Heirloom Tomato & Goat Cheese Flatbread


By this point, I'm sure I've told you all before that I am NOT a fan of tomatoes. However, recently they have been growing one me. During one of my lunch breaks this week, I wasted perfectly good napping time by going on Pinterest (OBSESSED!!!) and stumbled upon a FANTASTICALLY delicious looking flatbread recipe. To my dismay, it had tomatoes on it. But they are cooked so I figured it can't be that bad. But, they are heirloom tomatoes which are different tasting than regular tomatoes (and they're much prettier, lots of yellows and greens and reds mixed in). AND, it had goat cheese... we don't even need to talk about my love for goat cheese. The tang of the cheese blended so well with the softness and sweetness of the heirloom tomatoes. But because I love my vegan mommy so much, I made half of the flatbread with goat cheese and the other half with vegan mozzarella. Both sides were very delicious! This heirloom tomato and goat cheese flatbread is a DEFINITE crowd pleaser (and if you are in the mood for a light tasting and simple pizza, you've hit the jackpot!).

What you'll need:
1 package of pizza dough
2 tbs. chiffonade basil
1/4 cup crumbled goat cheese
3-4 heirloom tomatoes THINLY sliced (the thinner the slices, the less juices there will be to make the bread soggy)
1 tsp. kosher salt
1 tsp. pepper

1. Preheat your oven to 375* (the universal temperature).
2. Spread your dough out as thinly you can on a greased baking sheet.
3. Slice the tomatoes as thinly as you can (I used teeny tiny ones and a serrated knife, which made life MUCH easier).

4. First, lay down the tomatoes, then crumble the goat cheese all over and add the salt and pepper.

5. Bake for about 20 minutes (or until the crust is golden brown).
6. Pull out of the oven and sprinkle the chiffonade basil all over.

7. Cut the bread into squares and serve immediately.

enjoy :)

Friday, January 13, 2012

Filet Mignon

This past week, my sister went back to school. We usually go out as a family for a going away dinner whenever one of us went back to school. But Monday night, we had a sister sleep over filled with great food, mindless TV (Real Housewives!!!) and froyo :) Being the nice sister that I am, I decided to make her a classic steak house filet mignon. I've made it before by following a Barefoot Contessa recipe but hers is WAY too salty. This lightly salted and baked with butter steak is the PERFECT treat for anyone. And, of course, it is INCREDIBLY SIMPLE!!!!!! If you like steak, you'll LOVE this!!!
*P.S. We're all on budgets these days, so buy your steaks at Costco. They come 4 in a pack and they're CHEAP but GREAT quality (and HUGE)!!!*

What you'll need (for 2 people):
2 10oz filet mignons
4 tbs. unsalted butter at room temperature
1 tsp. pepper
1 tsp. fleur de sel found here (it is a very delicate French Sea Salt. Gelson's has it. You MUST use this)
2 tbs. vegetable oil
1 cast iron skillet (your local hardware store will have one. Again, you MUST use this)

1. Preheat your oven to 400*. While your oven is heating up, heat your cast iron skillet on HIGH head for about 8 minutes, getting it VERY HOT!!!
2. Pat your steaks dry and brush with oil.
3. Sprinkle the fleur de sel and pepper all over.

4. Sear your steaks for about 2 minutes on each side, creating a nice golden crust all over (remember, this will lock in all of the juices.), for a total of about 10 minutes
 

5. Cut the butter into thick slices (1-2 tbs. per steak) and place on top of each steak.

6. Immediately place skillet into the oven and bake for abut 5-8 minutes for medium rare, and 10 minutes for well done.
7. Remove and place a piece of foil over the skillet and let rest for a few minutes to let the juices redistribute.

8. Add steaks to a platter, and pour juices over the top (this sauce is INCREDIBLE. Butter and steak drippings mmmmm :)).
9. Serve hot. You need NO extra sauces besides the drippings. As the sauce sits, it'll thicken up and get even better!

enjoy :)