Search

Monday, February 27, 2012

Chocolate Chip Cookie Mousse Cake

Oh my goodness gracious. I honestly don't even know where to begin with this recipe. It is honestly one of the most decadent, incredible things I have EVER made. My mouth is actually watering as we speak. No, seriously. Freshly baked chocolate chip cookies and Kahlua-Espresso chocolate mousse (you can barely taste the Kahlua, like AT ALL). Yes, you read that right. I don't even know what to call this cake except for DELICIOUS! Anyways, this cake sits for about 12 hours to chill and allow the cookies to soak up the moisture of the mousse (made from heavy cream and mascarpone). It...

Sorry, I got so excited writing about this that I had to go take a bite of the edge. UGH it's so good!  Next time you have a party or dinner or just have a craving for something REALLY sweet, this is absolutely perfect. Please promise me you'll try. As Barefoot Contessa describes this cake, "it'll bring a grown man to their knees." (It almost did, ask Eliot!)

What you'll need:
2 cups COLD heavy cream
1 8 oz. container of Mascarpone (an Italian cream cheese style something)
2 tbs. unsweetened cocoa powder
1/2 cup granulated sugar
1 tsp. vanilla extract
1 tsp. instant coffee powder
1/4 cup Kahlua (or any other coffee liqueur)
1 1/2 lb. freshly baked chocolate chip cookies that are FLAT!!! (if you don't want to bake them you can buy them)

1. Follow a recipe (or a grocery store isle) to bake your cookies. THEY NEED TO BE FLAT!!!!!!!!!!
2. To make the mousse, add the heavy cream, mascarpone, cocoa powder, coffee powder, vanilla, sugar, and Kahlua to the bowl of an electric mixer fitted with a whisk attachment (you can use a hand mixer but it takes a while).

3. Start it on very slow speed to mix all of the ingredients. Slowly speed the mixer up, for about 2 minutes, until it gets stiff and forms peaks.
4. Time to start layering!!! Get a large spring-form pan (or any pan where the bottom and top separate) and begin with a layer of the cookies, then mousse. Repeat until there are 5 layers of each (if you don't have enough room in your pan, make the mousse layer a little thicker. That's what I did).
   
5. Cover with plastic wrap and let it sit in the fridge for at least 12 hours.
 
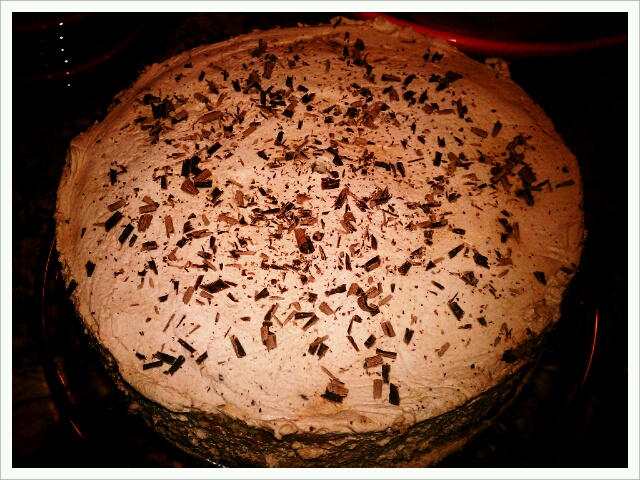
6. When you're ready to serve, use a sharp knife and run it around the edges so it comes out easily.
7. Slice and serve.
the delish inside!!!
chocolate mousse and cookies!!!

enjoy!!!!!!!!! (I KNOW YOU WILL!!!!!!!)

Friday, February 24, 2012

Baked Chicken Nuggets

Holy moley. I have to hand it to myself, this was a pretty darn good meal! I usually stick to the same boring recipe for making chicken fingers (bread crumbs, parmesan, flour & eggs) but I didn't feel like doing that tonight. Plus, I'm trying to eat healthier AND I like things super crunchy (basically burnt). The key to making this recipe so great was using ONLY panko bread crumbs. It make the nuggets have this light yet crunchy coating that was delishhh! They're super tender and they're NOT bad for you! I serve it with sweet potato fries and green beans and it was an absolutely PERFECT dinner! Om nom nom this was just so good my mouth is watering just looking at the pictures!!!

What you'll need:
2 boneless, skinless chicken breasts
1/4 cup whole wheat panko
2 tbs. regular panko
2 tbs. grated parmesan cheese (fresh, please!)
1 extra large egg
Salt & pepper
Olive oil spray

1. Preheat your oven to 425*
2. Cut your chicken into pieces that are about the size of a quarter.
3. Make your dredging station (one bowl egg, the other one the breadcrumbs and parmesan).
4. Spray a cookie sheet with the olive oil spray.
5. Dip your chicken pieces into the eggs then the breadcrumb/ parm mixture then place them on your cookie sheet.
6. Once they're all on the sheet, spray the tops with the olive oil spray (this will give them a nice golden color on top). Bake for about 8-10 minute (take one out at 8 minutes and cut it in half to see if it's cooked all the way through).
7. Serve with your favorite dipping sauce (ok ok ok I hoard the In-N-Out sauce, SUE ME!!!).


enjoy :)

Tuesday, February 21, 2012

Lemon Garlic Spaghetti


***First off, I must apologize for how lousy my pictures have been lately. I haven't been using my camera, just my phone. So even though this meal doesn't look as fabulous in pictures as it did on my plate, I assure you it was MY FAVORITE SPAGHETTI EVER!!!***


Anywho, after the last pasta dish that I made that had lemon and parmesan in it, I was a little afraid to make this one (Daniel did NOT Like the last one). But I have been lusting over this recipe for a lemon garlic spaghetti that I saw on Pinterest about a month and a half ago. Now, in my opinion, there is NEVER enough lemon (if you've ever had the pleasure of watching me drink a glass of water you'd notice I put nearly an entire lemon in one glass... and that's still not enough) so I knew that with just HALF a lemon for this ENTIRE meal it couldn't possibly turn into the disaster of the last lemon pasta meal. Needless to say, I was looking forward to this meal ALL day! And mommy wanted the pasta too so I made her a vegan version with lots of lemon (she loves lemon almost as much as I do). Its just the right hint of lemon, and the crunch of the pine nuts with the garlic oil, OMG. It's simply DIVINE! It's a very light dish that you pasta-loving readers of mine will LOVE!!!


What you'll need:
1 box whole wheat spaghetti
1/2 cup grated parmesan
3 tsp. olive oil
4-5 clove garlic

Freshly ground black pepperJuice from 1/2 lemon
3 tbs. toasted pine nuts (whatever, that's just a number I threw out there. The more the merrier!)
About 6 basil leaves, chiffonaded (remember, thats just a fancy word for stacking them on top of each other, rolling them up like a cigar, and running your knife across to create long, thin strips)


1. Boil a large pot of water. Once it's boiling, add a handful of KOSHER salt (remember, doing this will flavor the pasta, pretty much the only chance you get to add flavor to the pasta itself).

2. Meanwhile, heat the olive oil in a pan and sauté the garlic until it is JUST starting to brown around the edges. IMMEDIATELY remove it from the heat. Congratulations, you've just made garlic infused olive oil :). 

3. Add the oil and the toasted pine nuts to a large bowl (if your pine nuts aren't toasted, then heat them in a pan for a few minutes. Once you start to smell them, they're finished. Remove them from the heat and add them to the bowl).
toasting the pine nuts
real
vegan

4. Once the pasta is ready, drain it and add it to the bowl. Toss it together and add the lemon juice and parmesan. Grind some pepper over the top and garnish with the chopped basil.

5. I made a vegan version of this with vegan parm and added vegan Italian sausages (which are AMAZING btw!!!).
 
6. Plate immediately and serve with a little more parmesan on top (eh, why not?).


enjoy :)

Brown Rice Stir Fry

A few nights ago we could NOT for the life of us figure out what to eat for dinner. Have you ever been in one of those moods where you're pretty hungry but NOTHING sounds good? Yea, that's about how we felt. We started rummaging through the pantry and fridge and amongst the 5 boxes of kosher salt (no, I'm not kidding) we found some rice medley and some other weird stuff. Back when I was in college if I couldn't figure out what to eat, I'd make a veggie stir fry so we decided to do that. Except, we were out of a lot of vegetables (it was mid-week, don't blame us!). So into the pan I threw some carrots, onions, peas, green onions, frozen rice, soy sauce, and voila! A yummy stir fry that filled us up just right!

What you'll need (this is just a basic stir fry, feel free to add/leave out any ingredients you want):
1 cup chopped onions
1 cup chopped carrots
3 cloves of garlic
1/2 frozen peas
1 package frozen brown rice (or any rice medley)
3 green onions (the WHOLE thing, white part, too!)
Some soy sauce (eh, a few dashes)
Grape seed oil

1. Add a few tbs. of the grape seed oil to a wok (or large pan) and get the oil hot enough so that when you put the handle of a wooden spoon in, it bubbles up the sides. Add the carrots and onions (mushrooms would be GREAT here, too. But we were out of them *sigh*)
 

2. Let the carrots and onions get to JUST about finished cooking (brown for the onions and the carrots still have a little texture to them) and add the garlic.

3. In a separate bowl mix together the peas and the green onions. Toss them into the pan at the END (the peas cook QUICKLY) and end with a splash of soy sauce (it'll start to sizzle!)
  

4. Follow the directions to cooking your rice and toss them all together in a pan and serve with a nice piece of salmon (or whatever you have that's about to go bad!)


enjoy :)

Albondigas


Last night I had dinner at my dad's house. I was so excited about how well the enchiladas came out the night before that I decided to make them again. This time, I only let the chicken go for 2 hours on high and it was PERFECTLY tender and moist. They shredded so well and cooked to perfection. But there were 6 of us so I needed something else to go on the side. I have never had albondigas, a Mexican meatball soup, before but my dad LOVES it so I gave it a try. Since I've never even tried it, I wasn't sure it tasted too great. Well, 3 bowls later, I'm pretty sure he enjoyed it! This is super EASY and pretty yummy side dish to have with any Mexican meal!

What you'll need:
1 lb. ground beef (organic, please!!!)
1 egg
1/2 cup bread crumbs
1/4 cup milk
about 4-5 carrots, chopped
1 large onion chopped
1 24 oz. can of diced tomatoes, juice included
4 cups beef broth (low sodium if you can find it)
Cumin (as much or as little as you want)
Chili pepper (again, as much or as little as you want)
Mexican oregano (you guessed it, as much or as little as you want)
1/2 cup long grain rice (brown rice is ok, too)

1. Place the chopped onions, carrots, beef broth, canned tomatoes, and seasonings in a large pot and bring it to a boil.

2. As it's boiling, mix the beef, bread crumbs, milk, and egg in a large bowl and make into small meatballs.

3. Once the pot is boiling, reduce to a simmer, add the meatballs and cook for about 10 minutes.
4. After about 10 minutes, reduce the heat to low, add the rice, and let cook for about 15-20 minutes.

5. Remove and serve HOT, season with cilantro (YUCKY!!!!! Me no likey!!!) or a sprinkle of Mexican cheese.

disfrutan :)

Sunday, February 19, 2012

Chicken Enchiladas

For date night this week, I wanted to do something different. I'm pretty sick of pasta or fish right now and I have had a yen for using my crock pot. It was cold enough to be able to use it tonight so I decided to bring it out and make something new. What part of the world did I want to visit, though? Well, I decided to go south of the border and make enchiladas! This is a very low carb, organic and healthy meal that I promise will leave you with AMAZING leftovers (well, at least I THINK so... they were turned into nachos and devoured before I got a chance to clean up!). I used the Gloria's brand of low carb flour tortillas (genuinely low carb, only 10 carbs per tortilla. That's GOOD!!!) Sorry, I hate corn tortillas. Now get out of here and go try this recipe! Ole!!!

What you'll need:
2 boneless, skinless chicken breasts (organic!)
3 tbs. taco seasoning
1 can corn, drained
1 can organic black beans, drained and rinsed
1 16 oz. jar salsa
Enchilada sauce (make it easy on yourself and buy the bottled kind from Trader Joe's)
3 ripe avocados
1 cup light mexican shredded cheese
5-8 low carb flour tortillas (Gloria's brand from Whole Foods)
1/2 cup sour cream

1. Preheat your oven to 400*.
2. Place the chicken and salsa in the crock pot (cut the chicken breasts in half if you want them to cook faster and shred easier).
 
3. Rinse the beans, then dump in the pot with the chicken, salsa, and add the corn, too. 
 
4. Add the taco seasoning and cook on HIGH for 3 hours or LOW for 6.
5. After everything is finished cooking, use a fork to shred the chicken, take about 2 spoonfuls and place in the middle of the tortillas. Roll them as tightly as possible and place in a GREASED pyrex dish (add a little bit of the enchilada sauce, too!).
6. Once you've placed all of the rolled tortillas in the dish, top with a light drizzle of enchilada sauce, the cheese, and one more drizzle of the enchilada sauce.
 
7. Bake for about 15-20 minutes, or until the cheese is bubbly.
8. Remove and serve with chopped avocados and a drizzle of sour cream on top.

disfrutas :)