Search

Monday, December 30, 2013

Rosemary Cashews


If you're like me and still scrambling to plan your New Year's Eve meal, then don't feel so badly. I just finalized my menu about 3 minutes ago. I started to panic about what to serve because some guests have dietary restrictions and they eat a lot so I don't want to disappoint anyone, but then I remembered: Don't panic! Most caterers and party planners would always tell you to but 75% of your appetizers and make the rest; don't put too much on your plate. Go with some simple cheese and crackers for the store bought options, maybe some sliced cucumbers and salami, and these cashews are easy, yet elegant enough, to be your "homemade" option. Butter, cashews, rosemary, and a little sweetener. BOOM THATS IT! 

What you'll need:
1 lb toasted, salted cashews
2 tbs. fresh rosemary, minced
1 tbs. kosher salt
1/2 tsp stevia
2 tbs. melted butter

1. Preheat your oven to 325*. Toast your cashews for 10 minutes, just enough to warm them. 
2. Mix revert thing else in a bowl. When cashews are warmed through, toss everything together. Let cool and serve! 

enjoy :)

Tuesday, December 17, 2013

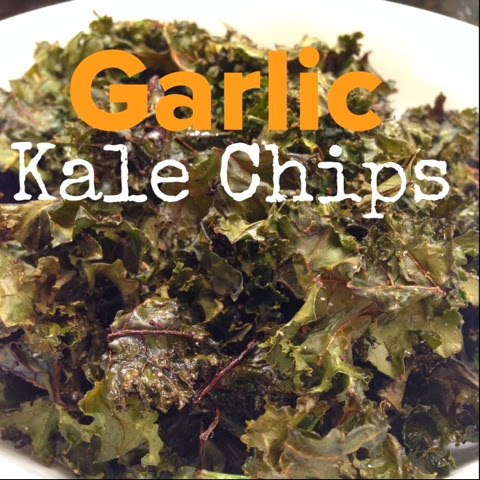
Garlic Kale Chips


I have a huge snacking problem. I just love anything that crunches. Chips, pretzels, you name it, I love it. I've been working really hard to get into shape so I had to give my beloved chippies up. A much healthier (and seriously, they're good) option is kale chips. I had about a 2 month obsession with these ranch kale chips from Whole Foods but at $5.99 per bag I realized it was getting ridiculous. So I started making my own to save my waistline and wallet. These are very easy and despite what other recipes may say, get the prechopped kale at the market. They're great for snacking, lunches, or just to make and having hanging around for a bad day.

What you'll need:
1 10oz bag chopped kale
Canola oil spray
1/2 tsp. garlic salt

1. Preheat your oven to 400*. Lay 1/4 of the kale on a baking sheet in a single layer. Spray with a few spritz of the canola oil and sprinkle a tiny bit of the garlic salt (the pan looks crowded but they will shrink). Bake for 20 minutes. 
2. Repeat the process until you've used up all of the kale chips (about 4 more times). 

enjoy :)

Tuesday, December 10, 2013

Holiday Gift Guide 2013

We've decided to push back our Hanukkah gift exchange until my sister comes back for Christmas. With just two weeks left, I have been struggling to find the perfect holiday gift for the foodies in my life. I've compiled my Top 10 list of foodie Must Haves for those that are in the same boat as I am (and who's bank account is struggling, too). All of the gifts are under $100 to save everyone's sanity a little bit. Oh, and almost all of the websites are offering FREE SHIPPING for guaranteed Christmas delivery!

1. A great set of whisky stones to keep your drink chilled and not watered down.

2. Blank gift tags to add a personalized touch to gifts.

3. Stainless wine opener and foil cutter.

4. Le Creuset signature round Dutch Oven, a necessity for all cooks.

5. Wood Monogram cheese board.

6. Cheery wood Boos cutting board.

7. "From the Kitchen of" Stamp from Yellow Owl Workshop.

8. ADORABLE Mason Jar shot glasses.

9. The Bible of cook books, Mastering the Art of French Cooking by Julia Child.

10. Reusable striped popcorn cups.

Monday, December 2, 2013

Gruyere and Prosciutto in Puff Pastry


Call me crazy but I'm already planning my New Year's Eve plans. I know, I know, we JUST had Thanksgiving but you know how I am. I was thinking about what I wanted to serve for appetizers (I'm not huge into going out; I'd rather open a great bottle of wine and feast until I can't move) so I began sifting through my cookbooks. I came across this little doozy from my lovely Barefoot Contessa. Her recipe called for ham rather than prosciutto and dijon mustard but Daniel LOVES prosciutto and hates mustard (I know, he's odd). This is a no-stress, simple appetizer that you can throw together in just minutes but will taste, and smell, like you've been slaving over it for hours! Oh, and did I mention the melty, gooey cheese?!

What you'll need:
2 sheets puff pastry, defrosted in the fridge overnight
5 slices prosciutto
8 oz. shredded gruyere
2 tbs. garlic aioli 
1 egg, beaten with 1 tbs. water (for egg wash)


1. Preheat the oven to 425* and line a baking sheet with parchment paper.
2. Lay 1 sheet of puff pastry on a floured surface and carefully roll it out to 10x10” square (just eyeball it if you don’t have a ruler handy). Transfer it to the baking shet and spread the aioli over it, leaving a ½ inch border. Begin layering the prosciutto down and top with mass amounts of gruyere.
3. Place the second sheet of puff pastry on the floured surface and roll it out to 10x10” square. Place it on top of the other pastry sheet, push down the sides and brush the top with the egg wash.
4. Cut 4 diagonal slits across the middle (this will allow steam to come out, or else it’ll explode).
5. Bake for 20 minutes, until puffed and golden brown. Let cool and serve.

enjoy :)

Sunday, December 1, 2013

Horseradish and Chive Mashed Potatoes


Probably the most important entity of your Thanksgiving, Hanukkah, and/or Christmas dinner is the mashed potatoes. There is about 10,000,000 ways to make them and I usually stick to roasted garlic and non-fat Greek yogurt but this Thanksgiving we celebrated the once in a lifetime event of Thanksgivukkah. To marry the flavors of Hanukkah and Thanksgiving I made horseradish and chive mashed potatoes. I'm not a fan of horseradish at all but apparently they were received by rave reviews! Of course the original recipe came from Buzzfeed and their incredible Thanksgivukkah menu, but I used a little less horseradish because I didn't want to offend anyone's taste buds. If you want to try something different with your side dishes then this is sure to please those with pallets that are up to experimentation!

What you'll need:
1 whole head of garlic, roasted
3 pounds Russet or Yukon Gold potatoes
2 tbs. horseradish
1 cup non-dairy creamer
3 tsp. kosher salt
1 tsp. pepper
1 large bunch chives 

1. Roast your garlic at 400* for 45 minutes.
2. Peel and boil your potatoes (remember, ALWAYS boil potatoes in cold water. This will take anywhere from 25-35 minutes). Drain and use a hand mixer to mash your potatoes. 
3. Slowly add the creamer salt, pepper, and garlic. Continue to mix until thoroughly combined. Chop and add ¾ of the chives and horseradish.
4. Garnish with the remainder of the chives and serve immediately.

enjoy :)

Happy Thanksgiving


Happy Thanksgiving everyone. I hope you got to spend it with those most special to you; I know I did!


Saturday, November 23, 2013

Pumpkin Pie Granola


It's now that day after Thanksgiving and the last thing you want to do is cook a full meal for your out of town guests. But guess what? You don't have to! Not only will nobody have room left in their stomachs for a big breakfast, but they're not going to expect you to put on a whole other production (they shoulnd't at least). But, if you REALLY want to surprise them, make a pumpkin pie granola! It is SO easy and you'll definitely have some left over pumpkin from the pies you were planning on making but gave up on (its ok, it happens to the best of us). I found the original recipe from Dashing Dish and it was a total hit with the kids at school (9 times out of 10 they're my guinea pigs).

What you'll need:
4 cups
Old fashioned rolled oats
2 tsp
Ground cinnamon
2 tsp
Pumpkin pie spice
1/2 cup
stevia or other sugar replacement
1/2 tsp
Salt kosher
1 tsp
Baking powder
3/4 cups
Pumpkin
1/2 cup
Applesauce (unsweetened)
3 tbs
agave nectar
1/2 cup
white chocolate chips


1. Preheat your oven to 325*. Line 2 baking sheets with parchment paper and spray with non-stick cooking spray.
2. Mix together the dry ingredients in one bowl and the wet ingredients in another (NOT the chocolate chips). Mix together and spread in a single layer on the sheets.
3. Bake for 20 minutes, stir around, then back for another 20 minutes. Take out and let cool (it may feel a little mushy but as it cools, it'll harden).
4. Break up and once cooled, mix with the white chocolate chips!

enjoy :)

Sunday, November 17, 2013

Cranberry Apple Sauce

Ok, everyone time to get real! Whether or not you want to admit it Thanksgiving is only 11 days away! EEK!!! I feel like every year I try to prepare and create lists ahead of time but end up doing everything the day of. This year, I want to try and de-stressify my day by actually getting a head start. I plopped some cranberries and apples in the slow cooker for about 8 hours yesterday and what came out of it this morning was pure magic. It required barely any effort (great) and made the house smell like the holidays (even better). By mixing together the cranberries with apples it gives the sauce a nice twist. Yes I know some people enjoy the jelly that slides out of the can (my sister) and others like the homemade stuff (the rest of the world) so I wanted to jazz it up a bit.

Now, if you want to do this in a pot on the stove because you're impatient like the most of the of, then follow these steps: Add all ingredients MINUS the apples to a small pot. Bring to a boil and reduce heat to low and cook for 20 minutes. Add the apples, cover, and cook for another 20 minutes.

I don't know about you, but I can't wait for Thanksgiving, it's absolutely my FAVORITE holiday!!! That's one thing crossed off my list (I'll actually be able to watch the parade this year!), and it's now in the freezer getting ready for the big day!

What you'll need:
1 12 oz. bags fresh cranberries
8 gala apples (if they're big, maybe 6)
2 tbs. cinnamon
1 tsp. kosher salt
1/4 cup sugar
1 tbs. lemon juice
Zest of two oranges
1/4 cup orange juice (about 1 orange)

1. Rinse your cranberries in cold water, dry, and plop into your slow cooker. Peel, core, quarter, and slice your apples into big chunks and add to the slow cooker.
2. In a small bowl, mix together the cinnamon, sugar, lemon juice, orange juice, and orange zest. Pour it over the apples and cranberries, sprinkle with salt, and let it cook for 8 hours.
3. Stir every 2 hours to break up the apples (after the 6th hour, the apples will start breaking down). Turn off after 8 hours and let it sit for another hour or so to thicken up. Let cool and serve or pack up and freeze!

enjoy :)

Monday, November 11, 2013

Pumpkin Spice Challah


There is this undeniable falvor and texture that you can only find in challah bread. Sure chcolate chip challah, raisin challah, plain challah are all delicious but how many times can you have a roasted chicken on a Friday night? With the fall holidays upon us, I wanted to take on a new twist to the usual challah bread we eat every Friday. This time, I had to dive into pumpkin challah (I'm a little obsessed with everything pumpkin these days), and I am here to tell you that the kids at school LOVED it (remember, we cook every Thursday with them). I did try to make this a few weeks ago with whole wheat flour and let me tell you this: IT DID NOT WORK!!!!! So please, don't do it! Anyways, I think I may use this challah recipe to make the challah for stuffing for Thanksgiving. Don't worry, I'll give it a test drive and let you know how it turns out! Oh, by the way, this recipe is a step-by-step way to make challah by hand. If you want to use a stand mixer you certainly may. Everywhere I say to do something "by hand," change it to "using a dough hook."Now, this is quite time consuming, so I suggest you do it the night before you wish to serve or the night of ONLY if you have about 3-4 hours to bake.

What you'll need (will make TWO loafs or about 30 cupcakes):
2 packages active dry yeast
1 cup water
3 tbsp granulated sugar
1 whole egg
6 egg yolks
1/4 cup honey (do NOT use agave, not the right sweetness)
2 tbs. canola oil
2 tsp. kosher salt
3 tbs. Pumpkin Pie Spice
1/2 cup brown sugar, packed
2 cups pumpkin puree (this is equal to one whole can)
7-9 cups all-purpose baking flour


2. Preheat your oven to 350*. In a large bowl, add the yeast, 1/2 cup water, and 1 tbs. of the sugar and mix by hand. Let the mixture sit for about 10 minutes to dissolve and become foamy (the foam should be quite thick. If this does not happen, then your yeast has probably gone bad!).
2. Once your yeast has activated (gets foamy), then add the the rest of the granulated sugar, egg, egg yolks, honey, canola oil, salt and spices. Use a whisk to throughly combine the ingredients.
3. Mix in the brown sugar and the pumpkin puree until the mixture is nice and smooth. Ok here comes the messy part: start adding in the flour, 1 cup at a time, using a whisk (or your hands) to form a dough. Keep adding until the dough is smooth and not sticky anymore. Knead for about 7-8 minutes.
4. Pour a few tbs. of canola oil into a large bowl and smear it all over. Plop your dough in the bowl, rubbing the oil all over the dough. Cover your dough with a CLEAN kitchen towel and place on your stove on TOP of your oven. ***(if your oven is not connected to your stove then preheat your oven to 200*, turn off, and let your dough rise in the oven while it is OFF)*** Let rise for 1 hour.

5. Take the dough out, punch it down a few times, then divide into cupcakes and cover to rise for another hour OR, if you're making a braided challah, put back in the bowl, cover, and let rise for another hour. 
6. If you're going to braid your challah, now is the time to do it on a baking sheet lined with parchment paper (learn how to braid your challah here). Divide the dough in half, and braid both halves into two challah loafs. 
7. Now, use 1 tbs. water and 1 egg yolk, whisked together, to make an egg wash. Brush the top of your cupcakes or braided challah, and let rise for 30 minutes more (this is it, I promise!). You'll know it's ready when you poke the dough and the indentation stays rather than springing back.

8. Bake in a 350* oven for 20 minutes, turn the pan (the back of the oven is the hottest so you want to make sure both ends of the pan bake evenly) and bake for another 20 minutes.
9. Let cool and chow down!!!

Tuesday, November 5, 2013

Tips in the Kitchen- DIY Silver Jewelry Cleaning

I've never really been one of those people who is in to "DIY" (Do It Yourself) projects, usually because I fail epically every time. But I've been pretty sick of looking at my cloudy and tarnished silver (I have no idea yet how to clean gold) jewelry in the mirror so I looked for an easy way to do it at home that uses very little (if any) chemicals. I found a few variations of the same recipe and they all seemed pretty easy. They called for a very few select items that everyone will most definitely have in their home. So I experimented, and... voila! My jewelry is looking like it's BRAND SPANKING NEW!!! All it calls for is near boiling water, baking soda, and kosher salt. THAT'S IT and your jewelry will be sparking like the day you got it :)

What you'll need:
1 tbs. kosher salt
1 tbs. baking soda
2 cups near boiling water
1 baking dish
Aluminum foil.

1. Line your baking dish with a single layer of foil. Pour baking soda and salt in the middle.

  
2. Drop in your jewelry and pour the water over it. Watch it sizzle and wait 5 minutes.
3. Rinse in cold water, pat dry, and you're good to go!


Saturday, November 2, 2013

Balsamic Steak Rolls

I came across this amazing recipe on, of course, Pinterest and I've been dying to make it for weeks. I have been on my very strict diet and most of the recipes I find on Pinterest are outside of the jurisdictions of my regime. But I was pleasantly surprised to find that this fit right in! I used flank steak, which doesn't have too much fat, and a ton of veggies to stuff inside. It's very cute and I think you just might be able to get your kids to eat it! If not, then there is more for you! Like I said, I lightened up the sauce and the veggies for my version but the original version looks just as great to me (but it has butter, brown sugar, and olive oil, all of which I am not eating). Either way, this will be a FABULOUS meal that looks complex but is SO easy! OH!!! Don't forget tooth picks!

What you'll need:
For the steak
2 lbs. flank steak
1 tsp. kosher salt
1/2 tsp. pepper
3 tbs. Worcestershire sauce
1 tbs. steak seasoning

For the veggies
1 carrot (I bought shredded and it worked perfectly)
1 zucchini
1 bell pepper (any color is fine)
6 green onions
1/2 red onion
1 tsp. herbs de Provence 

For the Sauce
Olive oil spray
2 tbs. finely minced shallots
1/2 cup balsamic vinegar
2 tbs. Stevia (or any zero calorie sweetener)

1. Prep your steak. Cut in to 8-10 slices, about 6 inches long. Salt and pepper both sides of the steak, then toss in a large zip lock bag with the Worcestershire sauce. Give it a good shake and let it sit in the fridge for an hour or so.
2. After an hour, take the meat out of the fridge so it can come to room temperature (it cooks more evenly when it is at room temperature). 
3. OK...Veggie time. Slice all of your veggies into match-stick sizes (I don't have a fancy machine to do it for me so I just went for it by hand), including the green onions. 
4. In a medium pan heated to medium heat, spray cooking spray and sauté the shallots. Add the balsamic, Stevia, and beef broth. Let simmer for about 10 minutes, then turn off heat to let it thicken (Don't worry, IT WILL!!!).
5. While the sauce is cooking, quickly stir fry the veggies in some cooking spray and whole garlic cloves (this just infuses the flavor f the veggies with garlic, but does not overwhelm). You do NOT want to cook them too much (they'll continue to cook inside of the steak when they're on the grill), so no more than 3 minutes.
6. Heat your grill pan time! Now, place a few pieces of each veggie inside of the steak so they're sticking out on the sides. Roll up and secure with a few toothpicks. Sprinkle with steak seasoning all over and start grilling toothpick side down. 
7. Grill for about 3-5 minutes per side and serve immediately with balsamic glaze!
Daniel wanted yo to see how perfectly it looked inside
enjoy :)

Chocolate Chip Waffles

After a long week of work and school, some Sunday mornings just call for homemade waffles, no matter what. But to make them extra special, you just have to add some chocolate chips! You really have no excuse NOT to. They're really quite simple to make and if you've baked just about anything in the last 6 months, you should have all of the ingredients in your pantry. I made these a little bit on the healthy side, opting for vegan butter and non-dairy creamer and they were just as fluffy as you could ask them to be!

What you'll need:
1 1/4 cup all-purpose flour
1/4 tsp. baking soda
1/2 tsp. baking powder
1/2 tsp. salt
2 tbs. sugar
2 whole eggs, beaten
2 tbs. vegan butter, melted
1 cup milk (I usually use non-dairy creamer)
1/4 cup chocolate chips

1. Heat your waffle iron by following the instructions it provides. Mix all dry ingredients in a large bowl, and all wet ingredients in a big giant measuring up (makes it very easy to pour).
2. In a separate bowl, alternate between mixing the wet and dry ingredients until well incorporated. Finally, add in the chocolate chips and pour on your waffle maker.
3. Cook until golden on both sides and serve with some warm syrup!

enjoy :)
Wednesday, October 16, 2013

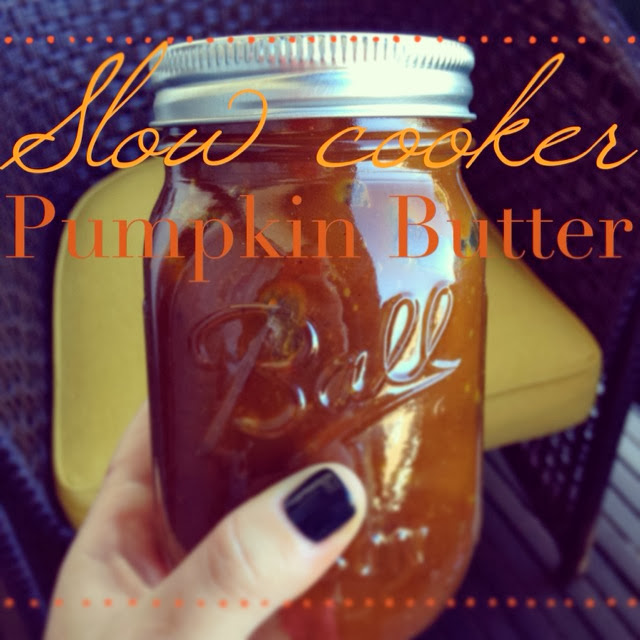
Slow Cooker Pumpkin Butter

Finally the nights are getting chilly and it's ALMOST time to light a fire and snuggle on the couch with some hot cocoa. But, until then, I'll happily welcome all of the other makings of fall. That means, of course, anything and everything PUMPKIN! Pumpkin butter, contrary to popular belief, is NOT a butter. It is like peanut butter or, the Godly, cookie butter; you can put it on just about anything you'd put peanut butter on. You can bake it in a jar in a water bath, but that's just far too complicated. The beauty of this recipe is that you can toss all of the ingredients in a slow cooker, go to bed, and wake up with your kitchen smelling like Thanksgiving and something yummy to smother on your toast! As you can see, I've jarred mine for optimum freshness (as of right now, I'm not too sure how long this will last, but if you like pumpkin as much as we do, it won't be around too long anyways). Put it on top of toast, a bagel, or even some pancakes or french toast! WOW ok I'm hungry now! BYE!

What you'll need:
2 cans organic pumpkin
4 tbs. pumpkin pie spice
1 tbs. kosher salt
Juice of 1 lemon
3/4 cup sugar
1/4 cup brown sugar
1/4 cup honey

1. Put everything in a crock pot. Cook on low for 8 hours.
2. After 8 hours, turn crock pot off and remove the top half way (to let the steam out and let it thicken). Let sit for an hour.

enjoy :)

Saturday, October 12, 2013

Pumpkin Pie Roasted Almonds


Is it possible to buy stock in Pinterest? If so, I need to do so ASAP because it is just the ultimate for foodies like me. I'm honestly addicted. I've already planned my entire Thanksgiving dinner, fictitious wedding, and next 10 birthday parties which each include fantastic finger foods. I found this amazing recipe for Pumpkin Pie Almonds from Knead to Cook and I tried to make it last week but nobody would let me. Now that I'm home alone with the dogs and have nobody to get in my way, you better believe this was the first thing I did when I woke up (besides run to 100 markets). The house now smells delightfully like Thanksgiving and, if I must say, these almonds are AMAZING. They're great little snacks and will be an even better appetizer for the big show! What I did differently was a little extra vanilla extract (I can't help it, I love it!), and I used Fleur de Sel (a French Sea Salt) rather than kosher or regular sea salt. Now be gone with you, go make these!


What you'll need:
2 cups raw almonds
3 tsp. of ground cinnamon
2 tsp. pumpkin pie spice seasoning (you can find it ANYWHERE right now)
3-4 tbs. organic agave nectar
1 tbs. of vanilla extract
Fleur de Sel (French sea salt)

1. Preheat your oven to 325*. In a large bowl, mix the almonds, cinnamon, pumpkin pie spice, agave, and vanilla. Make sure every almond is evenly coated with the agave and spices.
2. Line a baking sheet with parchment paper (if you can, try to avoid foil for this. The almonds WILL stick to the foil) and lay out the almonds in one single layer. 
3. Dust the sea salt over the almonds and bake for 18-20 minutes.
4. Let cool for at least 30 minutes before serving!

enjoy :)


Matzo Balls

When it comes to matzo balls and matzo ball soup, Jerry's Deli is my usual go-to. But now that fall is coming and my wallet is getting lighter and lighter by the day (being a grown up stink!) I can't go out and buy every meal. But I am happy to say that this is a fabulous (and if I do say so myself, big competition to restaurants!) recipe for matzo balls. Everyone's mom and grandma have their secrets and tricks and recipes to make, what they say are, the best matzo balls. This recipe is simple, light, and yummy. That's all you really need in a matzo ball! You'll definitely impress your guests this fall, and save it for the spring when Passover comes around to impress them again! All you need is a little patience (the longer you let the mixture sit in the fridge to firm up, the better!).

What you'll need:
1/2 cup matzo meal
2 eggs, beaten
2 tbs. vegetable oil
1 tsp. kosher salt
1/2 tsp. pepper
2 tbs. chicken stock
1 tbs. fresh dill, chopped
1 tbs. flat leaf parsley, chopped
2-3 cloves garlic, minced
1 shallot, minced

1. Mince and chop your garlic, parsley, dill, and shallot. In a VERY large bowl, mix together the matzo meal, eggs, salt, pepper, oil, and chicken stock.
2. Gently fold in the herbs and garlic and shallots.
3. Cover with plastic wrap and let sit in the fridge for at least an hour. Once chilled, roll into balls the size of golf balls (they WILL DOUBLE IN SIZE!!!! so don't worry). Drop into a pot of 2-3 quarts of boiling chicken stock.
4. Cook matzo balls for 30 minutes. At the last 10 minutes, toss in an extra tbs. or two of fresh chopped dill. Serve immediately!

enjoy :)

Chocolate Chip Cookie Bars

So this is pretty much just a giant chocolate chip cookie. And really what is better than that? Not much :) Like I've told you in my past few posts, I'm on a very strict health regime so I did not taste this but the consesus from my family was that it was absolutely divine. The only problem was that I cut the pieces too big. It is a cookie, after all, so be prepared for a whole lot of sweetness. I topped it with some fresh, homemade whipped cream (which you can skip, of course) and it made for a very rustic, classic dessert that any of your friends will be impressed with! It's great to make for a large group a few hours before guests arrive, and let it sit out to cool until ready to serve!

What you'll need (makes 12 LARGE cookie bars):
2 1/4 cups flour
1/2 tsp. salt
1/2 tsp. baking soda
12 tablespoons butter, melted and cooled to room temperature
1 cup brown sugar, packed
1/2 cup sugar
1 large egg, plus one egg yolk
2 tsp. vanilla extract
1 cups chocolate chips


1. Preheat your oven to 325*. In a large bowl, mix together the sugars and the melted butter. Slowly add in the eggs and the vanilla extract. 
2. In a separate bowl, sift the flour, salt, and baking soda. Slowly add to the sugar and egg mixture until just combined (by this I mean DON'T over mix it!).
3. Toss the chocolate chips in 1/8 cup flour (this will keep them from sinking to the bottom of the cookies). Fold in to the batter. Bake for 25-30 minutes (if they look gooey, THAT'S OK!!!! Let them be!).
4. Let cool for at least 10 minutes before serving.

enjoy :)

Sunday, September 29, 2013

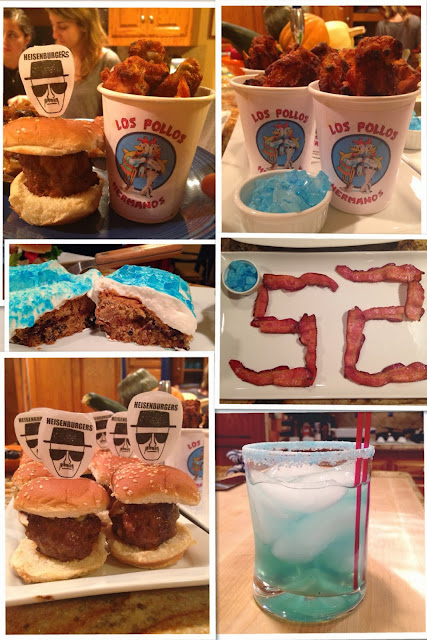
Breaking Bad Finale

For those of you who have been living under a rock for the past 5 years, Breaking Bad, the best written show in TV history, aired its final show tonight. It was emotional, it was funny, it was just pure cinematic perfection. To get into the spirit, I created a menu that represented the best elements of the show. We had Heisenburger sliders, Los Pollos Hermanos french fries and buffalo wings, bacon for Flynn (who loves breakfast), and a chocolate chip cookie cake with homemade whipped cream and Walt's singnature blue methamphetamine rock sugar on top (don't worry, the recipe for those are coming shortly!). If you haven't yet watched the show, you have an assignment: I will NOT post a new recipe until everyone has caught up! Ok ok, I take that back. But seriously, you NEED to! Enjoy this little glimpse into our epic Breaking Bad Finale viewing party!


Thursday, September 19, 2013

Slow Cooker Mushroom Basil Marinara

Like I told you all in my last post, I'm on a very strict diet and one of the biggest NO-NOs is canned or jarred tomato sauce; there's just too much sugar and other junk so I figured this would be a great opportunity to make my own! I looked up a few recipes and some called for 2 types, one type, or a bunch of types and thats what I wanted. I like a lot of flavors so I chose 4 different types of tomatoes: cherry, heirloom, roma, and plum. Each has a different taste, and when cooked together, marry very well together. So, after 2 days of cooking, I tasted it with some zucchini spaghetti last night... holy crap. IT. WAS. AMAZING!!! I could have done it in the slow cooker for about 8-10 hours but after that much time it just didn't seem ready enough. So I let it go overnight then all day again for a total of 30 hours. I know that is a LOT of time, but just turn it on when you leave for work one day (ON LOW!!!) and keep it going until dinner the next night. The longer the better, I promise!  BUT, if you're impatient, then overnight for 8 hours plus and extra 4 on low is just fine! The different tomatoes each bring a sweetness and the mushrooms add some great texture. Clearly I have an addiction to garlic so I added about 10 cloves and it was just lovely. Finally, a bunch of chopped basil made for a great zing of extra flavor! This is great on top of chicken, pasta, or even by itself with some bread for dipping!

What you'll need:
1 lb. cherry tomatoes
1 lb. baby heirloom tomatoes
1 lb. roma tomatoes
1 lb. plum tomatoes
1 lb. sliced crimini mushrooms
1/2 lb. sliced shiitake mushrooms
6 cloves garlic, minced
2 shallots, sliced and lightly sautéed
2 tbs. kosher salt
1 tbs. pepper
16 basil leaves, chopped

1. Chop the roma and plum tomatoes into 1/2" cubes, and slice the cherry and heirloom tomatoes in half (ok, I totally skipped this step and maybe that's why it took so long for mine to cook...). Slice your mushrooms and mince your garlic.
2. Toss EVERYTHING into the slow cooker and cook on LOW for about 8-10 hours. Cook again for 4 hours on HIGH.
3. Let cool and serve with pasta, chicken, or bread.

enjoy :)

Tuesday, September 17, 2013

Chocolate Chip Challah

To celebrate Rosh Hashanah (the Jewish new year)  at school last week I was feeling a bit overzealous and decided to make a challah! Now this was my first time making a bread that requires kneading so I was petrified. And to make it more appetizing for the kids I made cupcakes instead of a huge loaf. I found the initial recipe on this ADORABLE blog about cupcakes and changed a few things around to create a challah that was so golden and crunchy that parents are STILL asking me for the recipe! OH and I did NOT make this with a stand mixer, I did it all by hand and it turned out GORGEOUS and delicious!

What you'll need:
1 1/4 cups warm water
2 tablespoons active dry yeast (2 packets)
3 tbs. honey
1 tsp. kosher salt
1/3 cup sugar (or sugar replacement such as stevia)
1/3 cup canola oil
3 large eggs
4-5 cups all-purpose flour
1 tbs. water 
1/2 cup chocolate chips
LARGET glass bowl
1 tbs. canola oil


1. In the bowl of an electric mixer, fitted with dough hook, dissolve the yeast in the warm water and 1 tbs. honey (mix it around with your hands). Let sit for about 10 minutes until foam develops on top. Hello, yeast, you're awake!
2. To the bowl, add the salt, sugar, 1/3 up oil, 2 eggs, and remaining honey. Give it a quick mix, then, ON SLOW, start to add the flour one cup at a time until it is no longer sticky. Keep the mixer going on low for 10 minutes to knead the dough (or do it by hand). 
3. Swirl the inside of the glass bowl with the remaining tbs. of canola oil. roll dough around in the oil so it is covered all over. Cover with a CLEAN kitchen towel and let sit in a warm area for 1 hour to rise (what I did was turn the oven on to 250 then turn it off and let the dough rise in there). Don't worry, it WILL get bigger!
4. After 1 hour, dump the dough onto a flowered board and punch a few times. IF YOU'RE MAKING ONE LARGE LOAF: Put BACK into the bowl, cover, and let sit for another 30 minutes in the warm oven. Remove and dump onto a floured board. Roll out like a big long snake and press chocolate chips all the way down the "snake." Start rolling so it looks like a giant cinnamon roll. Place on a baking sheet lined with parchment paper.
IF YOU'RE MAKING CUPCAKES: Line a cupcake pan with cups and roll the dough into the shape it looks like in the picture (you know like you did with play-dough when you made a snake when you were a kid!) and tuck chocolate chips all throughout. Cover with the towel and put back in the warm oven to rise for another 30 minutes (they're double in size, AGAIN!).
5. Beat the remaining egg and 1 tbs. of water. Brush the tops of the challah (this will give it the beautiful golden brown color) and bake for 30 minutes (for cupcakes) and 40 minutes (for whole loaf)


Monday, September 16, 2013

Just a little something that made me smile. Julia knows all :)
Cucumber Salad


I want to apologize for not having posted in 2 weeks. I have been on a strict health regime and diet and have lost almost 20 lbs. in 2 weeks!!! I decided to make a change and have been working with a doctor to get healthy. What I've done is basically cut out all "bad" carbs, so for the next few weeks, get excited for protein and veggie-heavy recipes coming your way!
The first thing I did to get myself ready was buy a whole bunch of new gadgets for my kitchen, most excitably the most amazing (and CHEAP!!!) spiral veggie slicer found here. I use it to cut cucumbers into thin slices, or spiral cut my zucchini to make spaghetti. At school, we've been making apple spaghetti with the kids and they're going absolutely CRAZY for it! The first recipe I will share with you is this great little cucumber salad. I thinly sliced 1 huge cucumber and mixed my own little tamarai-ponzu dressing. This is considered a "free" snack so I will seriously eat about 4 of these every day.

What you'll need:
1 hothouse cucumber (the big ones)
1 tsp. tamari (gluten-free soy sauce)
1/2 tsp. fresh lemon juice
1 tbs. chopped scallions

1. Use a deli slicer, spiral veggie slicer, or a VERY sharp knife (be careful!!!) and slice your cucumbers VERY thinly.
2. In a small tupperware container, combine the tamari, lemon juice, and scallions and give them a good shake. Pour over cucumbers and chow down!

enjoy :)

Monday, August 26, 2013

The Day After...

This weekend my two oldest girlfriends and I took a cooking class at eatzLA, this fabulous little cooking school in LA. It's the same place my mom and I took the Julia Child cooking class a few months ago. The theme of the course was "The Day After..." so, essentially, a good hangover brunch menu. Actually, it's just as delicious even if you're not hung over. The menu included a spinach and sun-dried tomato fritata, potatoes O'Brien, crepes Suzette, and eggs Benedict. It was one of the most fun-filled 3 hours I've ever spent. If you ever get a chance to attend a cooking class, no matter the theme, I strongly suggest you try it. Not only is it entertaining and a great way to meet people, but you learn so much about food and cooking that you never thought mattered (did you know how to properly peel garlic cloves off of the head? Me either!), and your knife skills. Here are some pictures of our fabulous girls day :) OH, P.S., give me a few days and I'll give you the recipes for each item!

the menu

did I forget to mention bottomless mimosas and bloody Marys?

mincing is not as hard as it seems! 
spinach, basin, sun-dried tomatoes, and asiago fritata 
 

crepes Suzette
need I say more?