Search

Wednesday, December 28, 2011

Apple Crumble

I'm definitely a dessert girl. My motto is: the more icing or frosting or chocolate, the better!!! I usually don't like fruit as a dessert at all (what's the point of that?!) unless is an apple pie or chocolate covered strawberries. For Christmas dinner this year, I was asked to make the dessert so I figured I'd go as traditional as possible, yet I was vetoed (again!!!) on chocolate. My next idea was to do an apple crumble, especially since we have it every year. For a meal like Christmas, Hanukkah, or Thanksgiving dinner, I suggest that you NEVER deviate from the traditional fixings. You're less likely to make a mistake and piss people off. So apple crumble it was!!! It's more elegant than an apple pie, yet still comforting and delicious. It's bubbly, it's crumbly, and it's simple exquisite with vanilla ice cream (which we had, of course!)

What you'll need (it's a biggie, it'll probably feed about 15-20 hungry people!):
Oval baking dish (any shape will do, but use a white ceramic one)
5 lbs. green apples (granny smith are tart and perfect)
Zest of 1 orange
Zest of 1 lemon
2 tbs. freshly squeezed OJ
2 tbs. freshly squeezed lemon juice
1/2 cup granulated sugar
1 tbs. cinnamon
1 tsp. ground nutmeg

For the topping:
1 cup flour
2/3 cup granulated sugar
1/2 cup packed brown sugar  (push it down in the measuring cup)
1/2 teaspoon kosher salt
1 cup oatmeal
1/2 pound COLD diced butter (it'll make the top flaky when it's cold)

1. Preheat oven to 350* and grease your baking dish.
2. In a LARGE bowl, juice and zest the lemon and orange and mix in the seasonings (do this before you peel your apples because as you peel them, they'll turn brown.).
3. Peel and core your apples, then cut them into wedges and immediately add them to the juice and seasoning mixture (this will keep them from turning brown).
4. Place in baking dish (it's fine if they over flow, they'll cook down and bubble over the side. DON'T WORRY, we want that :))
5. Place all of the fixings for the topping in an electric mixer and mix until the butter is about the size of peas.
6. Pour all over the top of the apples.
7. Place dish on top of a baking sheet and bake for about 1 hour, or until the top is golden and it's bubbling over the sides.
8. Let cool for about 10 minutes then serve with vanilla ice cream!

enjoy :)

Tuesday, December 27, 2011

Pesto & Goat Cheese Palmiers


I think by now we all know how much I love my Ina Garten (Barefoot Contessa). Her food is so classic, chic, and simple. So it was no surprise that I turned to her to make an appetizer for our Hanukkah party (and Christmas Dinner at Grandma's house). I am a HUGE fan of pesto and goat cheese. In my opinion, everything tastes better with goat cheese. Yes, it has a stronggggg taste, but when it's cooked, it's much more mellow and perfectly decadent. You can omit the goat cheese if you want, but I wouldn't suggest you substitute it with anything (if you MUST, then try feta). They're filling, so you can have them with dinner, or as an appetizer with a dinner that is on the lighter side, like a soup or salad (eh, who am I kidding, indulge!!!)This is a definite crowd pleaser, I  promise!


What you'll need:

1 package frozen puff pastry, defrosted (it won’t move if you don’t let it defrost!!! And, try to get the kind that DOES NOT fold, they’re more difficult to deal with)
¼ cup pesto (in do time I will share my recipe)
½ cup goat cheese, crumbled
¼ cup finely chopped/minced sundried tomatoes
¼ cup raw pine nuts (or toasted)
Kosher salt

1. Preheat oven to 400*.
2. Roll out defrosted puff pastry on a FLOURED cutting board with a rolling pin (that is ALSO covered in flour.) to about 9"x11"
3. Spread a light layer of the pesto ALL OVER the dough.
4. Crumble the goat cheese on top of the pesto, spreading out a bit (you don't want TOO much goat cheese, it's taste is STRONG!!!)
5. Mince or finely chop the sundried tomatoes (cheat and use the food processor, I did!!!) and spread evenly all over the pastry.
6. Toast the pine nuts in a skillet over medium heat for JUST a minute. If they burn, they'll taste AWFUL! You want just a little golden brown color. (If you have toasted pine nuts, then skip this step)
7. Let the nuts cool, then toss over the pastry.
8. Starting with the shorter sides, start rolling them in towards the middle until they BARELY touch.
9. Cover tightly with plastic wrap, and start pushing everything outward (you'll understand when you do it) to make it longer.
10. After about an hour or so, cut the pastry into ½ inch slices and place them on a greased baking sheet, cut side up.
12. Bake for 14-15 minutes (or until they're golden brown).
13. SERVE HOT!


enjoy :)

Lemon Bundt Cake

Happy Holidays, my lovely followers!!! I'm so sorry it has taken me so long to post a new recipe; you all know how draining the holidays are! BUT!!! I do have some AMAZING recipes coming your way :) (I got FOUR cook books, a Cuisenart ELITE Food Processor, Hand Mixer, Hand Blender, and a mushroom brush for Hanukkah, so I hope you're all ready!!!) First, I'll start with an incredibly easy and delicious dessert: LEMON CAKE!!! I'm not a huge fan of lemon cake, but the rest of my family is (I wanted a chocolate cake, but I was vetoed). I've had it in the past with a heavy icing and I think its too much (oh don't get me wrong, I LOVEEE icing!!!) So with a light drizzle, this makes the perfect dessert after any meal. P.S. this recipe is for one large cake in a bundt pan, but you can certainly divide it in half and make one small cake in a loaf pan.

What you'll need:
½ pound (2 sticks) unsalted butter, at room temperature (Its much easier to mix)
2 cups granulated sugar, divided
4 extra-large eggs, at room temperature (again, it is easier to deal with and it won't shock the rest of the ingredients)
The zest of about 6 lemons3 cups flour
½ tsp. baking powder
½ tsp. baking soda
1 teaspoon kosher salt
¾ cup freshly squeezed lemon juice
¾ cup non-dairy creamer, at room temperature
1 tsp. pure vanilla extract
Lots of bowl for mixing 

For the icing:
2 cups confectioners' sugar (fancy word for powdered sugar), sifted (to get all of the lumps out)
3 ½ tablespoons freshly squeezed lemon juice (about 1 lemon)

1. Preheat oven to 350*
2. In an electric mixer, cream the butter and sugar together for about 5 minutes (until it gets light and fluffy).

3. Slowly add in the eggs, one at a time, followed by the lemon zest.
 
4. In a separate bowl, sift together the baking soda, baking powder, salt, and flour.
 
5. In a THIRD bowl, combine the non-dairy creamer, 1/4 cup of the lemon juice, and the vanilla.
6. Slowly add the flour and creamer mixture into the bowl of the electric mixer, alternating (if you do all of the flour at once, be prepared to wear it!).
7. Pour batter into your buttered pan, stick it in the oven and bake for 45 minutes to 1 hour (until the cake tester comes out clean).
8. For the icing, combine the confectioners' sugar and the lemon juice in a bowl, mixing with a fork until smooth (you might need to taste it to make sure it's sweet enough).
10. LET CAKE COOL BEFORE YOU REMOVE IT FROM THE PAN!!!!!!! Once cooled, place on cake plate.
9. Pour over the tops of the cakes and allow the glaze to drizzle down the sides (REMEMBER TO LINE YOUR CAKE PLATE WITH PARCHMENT PAPER OR ELSE YOU'LL MAKE A MESS OF THE GLAZE, LIKE I DID :()
 
enjoy :)

Sunday, December 18, 2011

Hasselback Baby Potatoes

A wonderful side dish to virtually any meal is a potato of some sort. Mashed, french fries, baked, they're all good. My mom has been making roasted baby red potatoes for as long as I can remember and they're always incredible. As you know, I am a little obsessed with the food network, and recently, I have been seeing a lot of sliced roasted potatoes. Well, they're not sliced all the way through, more in sort of a fan. HELLOOOOO we eat with our eyes first so who wouldn't want to eat them?! So, I figured that I'd try to make them. Eh... not as easy as I thought; they take time and patience to do them this way, but they get crispy on the edges and stay nice and soft on the inside. I promise, you'll be very happy :)

What you'll need
A few lbs. of baby red potatoes (you can use any potato for this recipe, but I like the red potatoes when using rosemary)
3 tbs. chopped fresh rosemary
1 tbs. kosher salt
1 tbs. pepper
3 tbs. olive oil (give or take)

1. Preheat your oven to 450*
2. Rinse your potatoes in cold water, then CAREFULLY slice them in 1/8" slices NOT QUITE slicing all the way through (use a pearing knife, you'll get more precise cuts and you'll have more control).
3. Finely chop your rosemary.
4.  Place the potatoes on a baking sheet and drizzle the olive oil on first (everything else will stick to the oil).
5. Sprinkle the salt, pepper, and rosemary on the potatoes, spreading them out if you need to to make sure that they're getting evenly seasoned.
6. Bake for about 35-40 minutes (until they get crispy on top)


enjoy :) (SEE, I TOLD YOU THIS WAS EASY!!!)

Saturday, December 17, 2011

Mashed Cauliflower


Over the past few months, I have been trying to cook healthier alternatives to my most favorite foods. While there is no substitute for some, I have found a great sub for mashed potatoes. I've shared with your my famous mashed potato recipe before, and, if you've tried it, you know how incredible it is. But, we can't always eat that much starch (boo hoo!!!) So I have have come up with a great recipe for...wait for it... MASHED CAULIFLOWER!!! I HATE cauliflower. I have NEVER liked it. Only in the past 6 months have I started liking broccoli. But mashed cauliflower tasted EXACTLY the same as mashed potatoes. Really you can add anything you want into it, but I find that less is more and the simpler the better. And, unlike mashed potatoes, theres NO SALT (Sorry, Jane). I promise you WON'T be disappointed and you'll want to eat this every night (like I have all week!)

What you'll need:
1 head (is that the right word?) of cauliflower
1 tbs. low fat sour cream (you can try non-fat Greek yogurt instead)
1 tbs. Earth Balance (the vegan version, but you can use Smart Balance if you want)
1/4 cup grated parmesan cheese (the powdery kind)

1. Bring a pot of water to a boil.
2. Cut the cauliflower into pieces, leaving the stems intact (it doesn't matter how big or small, they're all going to get mashed, anyways).

3. Once the water comes to a boil, add the cauliflower and cook for about 8-10 minutes (I know it seems long, but you want it to be a good consistency for mashing).

4. Use a fork to test them, and if it feels like the fork starts to break the cauliflower apart, then it's ready to be drained!
5. Turn off the heat, drain and return to pot. Start mashing! (depending on what level of lumpiness you prefer, that's how much you'll mash)

6. Once mashed, add the parmesan, butter, and sour cream.

7. Mix thoroughly, and you're ready to eat!!!

 enjoy :)

Wednesday, December 14, 2011

Slow Cooker Brisket


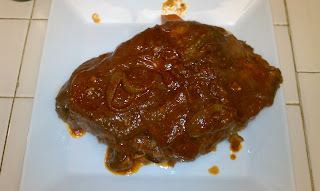
Ladies and gentleman, I am so proud to say that I officially, and VERY successfully, cooked my first brisket!!! As a Jewish woman, I figured it was time to learn to make the ultimate holiday staple. Now, I am never one to toot my own horn, but ohmygosh this was one of the BEST DARN THINGS I've EVER made!!! I couldn't stay away from the juices as it was cooking. My mouth is watering just thinking about it right now!!! Anyways, I have tasted my fair share of brisket over the years; Mrs. Gelson's, cooked in the oven, and slow cooker brisket. I have to say that my favorite was the oven roasted version. However, I have neither the time nor the patience to sit and watch it cook for 5 hours and baste it and and and just no!!! AHHA!!! Enter my new favorite toy, the slow cooker. While I will fully admit that I was both terrified and overwhelmed because of all of the recipes I had seen online and all of the different versions I have had over the year, this was the EASIEST MEAL I'VE EVER MADE! AND, very budget friendly! I'll have leftovers for days (and it's even better day 2!) Get excited!!!

This is what you'll need (this will feed 4 people)
4-5 lb. brisket (COSTCO baby!!!)
1 LARGE can tomato sauce
1 can tomato paste
1 packet Lipton Onion Soup Mix (yes, you read correctly)
4 small onions (or 2 large) sliced
5-6 medium carrots peeled and cut into chunks
2 tbs. vegetable oil (or olive or canola oil)
1 tbs. salt
1 tbs. pepper

1. Pat the brisket dry and sprinkle the salt and pepper on either side.
2. Heat the oil in a large skillet and braise (fancy word for searing then cooking in liquid) the brisket for 8-10 minutes on either side (this will create a nice crust that will lock in the juices and flavors). IT WILL BEGIN TO SHRINK, DO NOT BE AFRAID, THAT'S SUPPOSED TO HAPPEN!

3. Slice the onions and chop the carrots. Add half of the carrots and onions to the bottom of the slow cooker.

4. Once the brisket has been seared on both sides, place it in the cooker (if it doesn't fit perfectly, DON'T WORRY!!! It WILL shrink!!!)

5. Add the rest of the onions and carrots on top of the brisket.

6. In a large bowl, mix together the tomato paste, onion soup mix, and tomato sauce. Once mixed, pour it on top of the brisket. (I didn't mix it together, I just plopped it all in the crock pot and mixed it around)

7. Put the top on and cook on low for 8 hours.

8. After 8 hours, remove the brisket from the cooker and let it rest on a platter for about 10 minutes before you slice (let those juices redistribute) and turn the cooker OFF.The juice will thicken BEAUTIFULLY. You'll notice that it shrank quite a bit (WE WANTED THAT!)

9. Slice and top with the onion and carrot gravy that thickened in the crock pot. (I served it with mashed cauliflower)
enjoy :)